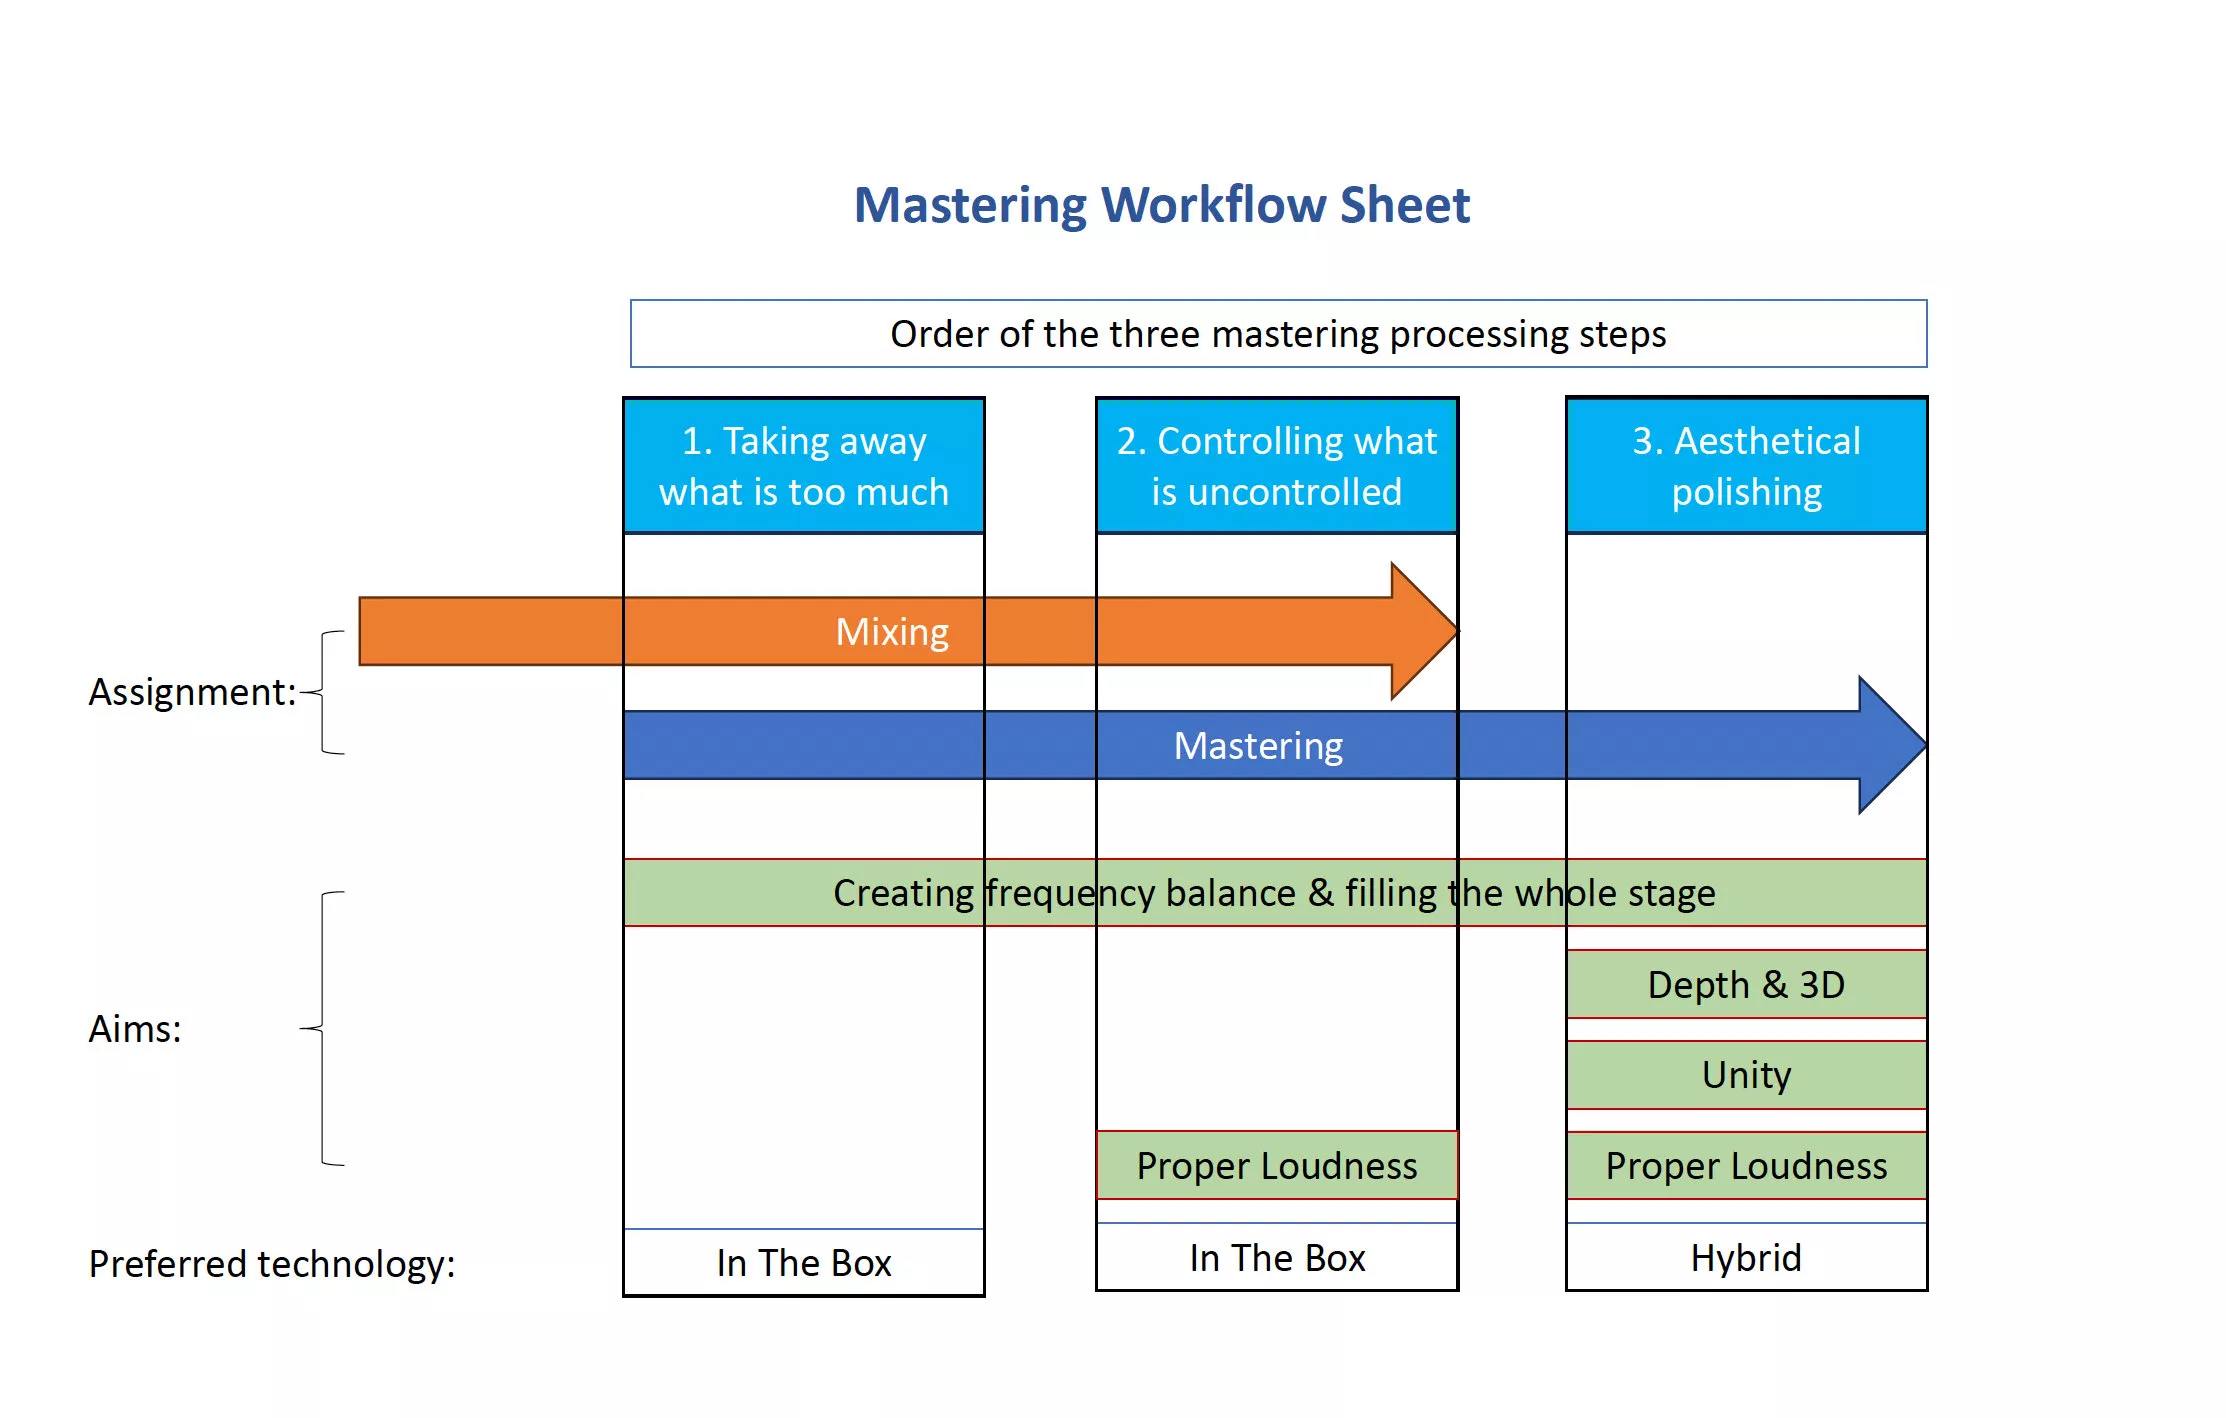
For whatever reason, my brain is somehow wired to immediately and playfully break down complex processes into schematics. In this case, a stimulating exchange with my wonderful and esteemed colleague and MA coach Farzad inspired me to put the three mastering processing steps I like to postulate into a slightly larger context. The result is the “Mastering Workflow Sheet”.
In part 1 of the blog post I go into the top half of the chart and in the next blog post I go into the Aims.
First processing step: Take away what is too much
I recommend to my mastering students that they focus on looking for things that might be too much and gently reduce them at the beginning of the mastering process. The emphasis here is evenly distributed on ‘gently’ and ‘looking out’, because it often happens that this editing step is somewhat over-interpreted. I use a suitable surgical EQ for this process (in my case the MAAT thEQorange) and verify if excessive resonances, especially in the lower midrange, are masking the sound image. Practicing this appropriately requires a little practice but also a suitable listening situation that gives you an honest acoustic statement regarding the balance of the lower midfield. We are talking about approximately 150 to 350 Hz.
I urge you not to pin me down to this figure, as there are of course mixes that may have a resonance problem at 115 Hz or 986 Hz or somewhere else. The point of such statements is the most likely to be true. Now, I show in editing examples within our modules how efficient this process can help to optimize the feeling of a mix through this unmasking so that it no longer sounds annoyingly stocky, but liberated. I would actually prefer to say the blend feels freer. Feeling is an important thing here. As most people know, I call this “emotional listening”.
Here are a few bullet points to find the right dose when reducing resonances:
1. Listen to your spontaneous first hearing impression. This is often where resonances show up, but the ear gets used to them very quickly if you don’t use your fresh ears to find them.
2. Practice distinguishing actual resonances (e.g. overlapping instruments or room modes) from the ringing that any EQ produces when sweeping through the spectrum at plus 12 dB.
3. It is rarely advisable to pull out more than a maximum of 3 to 4 dB, especially with a linear phase EQ.
4. Use the “negative difference” function of your EQ to check if it is really the interfering resonances you are trying to control.
5. Check if the mix loses too much warmth due to the reductions and compensate with a wide minimum phase Bell or Saturation if necessary.
6. If there are still significant resonances, continue with a Dynamic EQ that only takes effect when the resonance appears to be temporary.
7. Check that your setting does not result in an unbalanced bass response (is the bass line still evenly loud?).
8. Frequent practice will cause you to hear the problems immediately, even without sweeping.
9. Not all mixes have problems here. So hands off if the mix is well controlled in the lower midrange.
The first (and second) processing step is assigned to the tasks Mixing & Mastering, because these problems should not actually occur in a mastering-ready mix. Unfortunately, this is not always the case in mastering practice, which then prompts us to fix this problem instead of the mixing engineer.
Second processing step: Control what is uncontrolled
We teach our mixing students to control the mix sufficiently so that the mastering engineer can concentrate on the actual mastering, the third step in the mastering workflow sheet. This is ideal for the overall process and result, but it is also not common practice nowadays, so we mastering engineers find ourselves completing the mixing process for the mixing engineer here too.
Uncontrolled is everything that falls out of the “norm”. If you imagine a characteristic curve on the Graphic Analyser for the genre you are mastering, then everything that temporarily breaks out of this characteristic curve is something that needs to be controlled. Anything that breaks out upwards in terms of level will trigger the limiter first and, in the worst case, drill holes in our brains when, for example, uncontrolled hiss and S sounds find their way to our ears. But it can also be harshness in the mids between 2 and 4 kHz or a dynamically uncontrolled synth arpeggio untamed by a running filter.
Why all this control madness?
Anything we don’t control and integrate well will backfire mercilessly when it comes to achieving the desired loudness. Unfortunately, it is much better to go through this process during mixing because there are much more granular intervention options that, if done well, lead to a better end result.
The tools used for processing step two are multiband compressors, de-essers, split-band compressors, dynamic EQs and de-harshing tools (e.g. Oeksound´s Soothe).
Third processing step: Aesthetic polishing
Here we finally come to the actual mastering process. In the past, mastering only started here because the other tools didn’t exist yet. I can’t say it often enough: the better the mix, the better the master. A good mix allows for a shorter mastering chain that has a greater impact with smaller steps, and in the end you get a master that sounds just like the mix; just bigger, deeper and more cohesive.
Classically, pure analogue is often used here. Depending on the situation, the analogue signal chain is supplemented at the end in the DAW by limiters or the like, i.e. hybrid work. With a good choice of tools paired with an expert attitude, more and more mastering engineers are also working “in the box” (ITB) nowadays. That is up to the individual.
Now I could go on in a blog post about the WHY of this sequence of the three processing steps. But I think this is sufficiently covered in our modules and coaching sessions.
I write more about the Aims in Part 2 of the blog post.
Happy Mastering!
Friedemann Tischmeyer, September 2023
