To understand this post, it is advisable to have read blog post #010 (Part 1). In Part 2, we will look at the Aims, which are shown in green in the lower half of the diagram and are distributed across the three processing steps.
The aims are clear: aesthetic EQing, depth & three-dimensionality and of course unity, which translates best as “uniformity”. Finally, in the third processing step, the final loudness of the master is determined. But now step by step again…
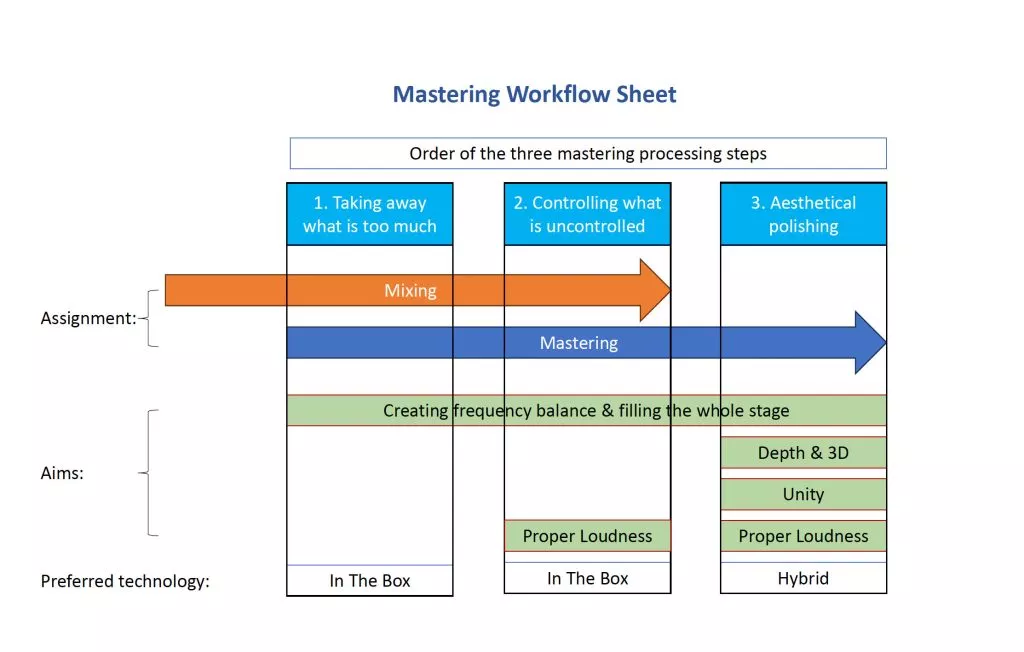
Establish frequency balance:
In principle, this aim is pursued in all three processing steps.
In the first step we take away what is masking, if this is necessary. Again, just because I show how to do this effectively in some examples does NOT mean that this is always necessary. Demonstrated signal chains always relate to the source material being worked on and need to be creatively and logically adapted to the situation. Besides cleaning up the lower midfield, the source material may “cry out” to want gentle dips (cuts) in higher frequency ranges as well. Careful listening is essential! There are many reasons why little meannesses creep in in a wide variety of frequency ranges. I myself work in a luxurious listening situation where “piercing” frequencies “fall into your ear” simply by sitting back, closing your eyes and listening. Ask yourself “is something annoying?”. If so, ask yourself “what exactly is annoying?”. Even though you might think it’s a bit dorky; talk to the mix at hand! That’s what I mean by “the mix screams for it”. Your mix basically always carries all the instructions for action. By asking questions, you can take this information from the mix in the form of instructions.
In the second step you take care of the control and work mainly with dynamic tools, for example to get the harsh mids (~2 to 4 kHz) under control or what I like to call the “fizzle concerto”, which is a joy especially often in hip hop productions. All these small steps prepare the balance of the imperfect mix for the actual mastering process, which is done in the third step. The preparation is necessary because the actual mastering process is then more successful. Analogue hardware in particular appreciates this preparation. Of course, nobody is perfect. This means that later fine-tuning in coordination with the tools of the step-three signal chain is absolutely normal and permissible. It is a process of approximation.
In the third step, more aesthetic EQs, multiband compressors and, if necessary, frequency-related saturation tools are used on the frequency balance level to achieve a balanced frequency response. MS tools are welcome helpers to use the stage evenly. Closed eyes work wonders when we look at the stage with our ears undistracted, looking for spots that are overcrowded and those that may be underexposed. Solo-in-centre listening to the M and S signals also helps with this task (MAAT 2BusControl).
Depth and three-dimensionality:
… are two words that describe something similar. If we now get fancy, depth rather describes what goes from the loudspeaker axis into the depth (behind the loudspeakers) and three-dimensionality what presents itself as spatiality and phantom sound sources from the loudspeaker axis into the room to the listener.
With ITB plug-ins and analogue equipment, there are many tools that help us create depth and three-dimensionality. The op-amp of a good analogue mastering console (e.g. SPL DMC) already creates fantastic depth on a good mix, while it reacts almost neutrally when you feed the console with a mediocre mix. A genuine Fairchild 670 marks the upper end of the luxurious 3D magic we use in mastering. However, there are plenty of more affordable hardware and various software tools that can help us out if the mix is crying out for it at all. That would be the good old Algorithmix K-Stereo or the modern Leapwing StageOne. A good reverb with an ambience preset that is bandpass-limited if necessary can also work wonders. Meanwhile, the plug-in world also offers excellent boutique mastering compressors that are also capable of bringing the magic of the analogue world into the box to some extent. So you don’t necessarily need to take out a mortgage to add a genuine Fairchild to your arsenal. I don’t have one either, by the way, though I haven’t stopped fondling it yet.
Unity:
For me, Unity is actually a feeling. In some situations I would describe it as “diminished fidgetiness”. This happens when many individual parts fidget wildly and unruly, yet well-placed. The mix feels unsettled. Applying appropriate compression and sometimes limiting changes the feeling of perception in a positive way. Everything seems more unified, but without being completely flat. This has psychoacoustic causes. When I sit in the Elbphilharmonie and listen to a world-class jazz concert in the ideal listening position in the first tier above the stage, I don’t hear 1000 individual parts, but all the individual parts in one unit. Why is that? The individual parts travel through the same amount of air, which in a similar way to a master bus compressor unifies the individual fragments of the mix. After all, all the individual parts have to travel through the same resistance of the distance of air. In contrast, the many individual parts of a very full production have by no means traveled through the same distance of air… It doesn’t feel uniform, it feels fidgety. A well-tuned mastering compressor will remedy this. The smooth RMS-controlled amplitude movement over the entire material creates this psychoacoustic illusion, provided that the compressor used ideally follows the double logarithmic of our ear with its characteristic curves. The word psychoacoustic implies that we feel rather than hear the difference.
Compactness is a relative of uniformity. They go hand in hand, but have a different character. Compactness is felt more in connection with beat and bass range. Again, it’s about control. Actually, mastering engineers are control freaks. Now it’s out….
By the way, parallel compression is handy when it comes to compactness.
Appropriate loudness:
Already the second step (control) automatically provides more loudness, because the uncontrolled peaks in different frequency ranges, which would trigger the limiter first, are pre-controlled, which leads to the fact that the final limiter only starts to go into the working range later; ergo, it gets louder. The actual loudness setting, however, only takes place in the third step. There are many ways to do this: one mastering engineer prefers to clip the AD-converter and another prefers the ITB-limiter or a combination of two limiters or clipper and limiter. Of course, this all depends on the complex decision-making processes already described in other blog posts.
I hope to have shed some light on the darkness of mastering magic.
In this sense – happy mastering!
Friedemann Tischmeyer, September 2023
